
You’ll never get a flat tyre at a convenient time, but with the right tools and a little bit of practice you’ll soon be changing tyres like an F1 pit crew.
PICTURE YOURSELF IN THE garage at home and you’re confronted with a choice. To your left, there is a four-foot long brown snake and to your right is a trolley jack, which you would like to use to change a flat tyre on your car…
Easy choice, grab the jack, right? As hard as it might be to believe, many more people die each and every year due to “vehicle jack related injuries” than succumb to deadly snake bites.
So, before you head out back to chop the head off your scissor jack with the nearest sharpened shovel, with some forethought and a few tips and tricks, you’ll be prepared and competent the next time a wayward screw tears a hole in your car’s tyre.
Prior to looking at how to go about successfully changing a tyre on the side of the road, let’s become familiar with the tools you’ll need to complete that task.
The following assumes that your car has either a full-sized spare or a space-saver, and doesn’t apply to run-flat tyres.
What will I need?
- Spare Tyre – inflated with plenty of tread depth;
- Wheel Brace – used to tighten and loosen the wheel nuts;
- Jack – appropriate to lift the vehicle;
- Wheel Chocks – either store bought or improvised;
- Jack Plate – to be used on loose surfaces, can either be store bought or improvised;
- Gloves – to protect your hands and keep them clean; and
- Cloth – for clean up.
Jack Types:
Scissor (pantograph)
Commonly supplied OEM with the vehicle as standard equipment. While if used correctly are adequate for the job, there are much better options available.
Mechanical screw
Another predominantly OME supplied jack, again will do a satisfactory job of it, but again there are much better options out there.
Mechanical Hi lift
If your Grandfather owned a farm, or your uncle owned a 40 series Land Cruiser, you’ll be familiar with the affectionately named “widow maker”. Becoming less and less relevant to modern 4WDs with the acres of ABS bumpers, there’s nowhere to use them. While it could be rightly considered the Swiss army knife of off-roading, it’s better left to the hard core off-roaders.
Hydraulic (bottle)
This is my choice of car mounted jack. Easy to use, robust and dependable. Even though they’re a little more expensive than a mechanical screw type jack. Use it more than once and you’ll think know it’s money well spent.
Hydraulic (trolley)
To be found in garages all over this great brown land. The trolley jack is the easiest and safest commonly available automotive jack. Unfortunately they’re also far from portable, usually weighing 10’s of kilograms. Hydraulic jacks use an incompressible fluid and pistons of different diameters to provide enough mechanical advantage to enable the operator to lift their car. They’ll usually have a bleed screw that must be tightened clockwise before lifting the vehicle. To lower the vehicle, slowly “bleed” the fluid from the from the jack’s cylinder by turning the bleed screw anti-clockwise. The rate of decent will be directly proportional to how much the bleed screw is turned. The jacks handle will usually be slotted to enable the jacks bleed screw to be turned.
The number 1 rule when it comes to jacks of any description: Trust them as far as you could throw it with both hands tied behind your back! In other words, never trust a jack, ever! Don’t put any appendage you care about under a car supported by a jack alone of any description.
Aus Standards
Automotive jacks sold in Australia must meet Australian Standards AS/NZS 2693 for Jacks. These standards mandate thing like safety factors and loss of height over time. Check the item for a compliance.
Jack Plate
If you’re jacking your vehicle up on a loose surface, such as sand or mud, a jack plate will stop the jack from pushing down into the soft surface without lifting the vehicle. It works more or less like a snow shoe. It distributes the weight of the jacking forces over a larger area.

How do you know you’ve got a flat tyre?
In a bygone era where the sidewall height of even performance cars was substantial, it was easy to tell if you had a sudden loss of air pressure, the car would lurch substantially toward the corner with the puncture and you’d feel it through the steering, and hear it too. These days, however, even economy cars run tiny tyre sidewall height in comparison with the tyres of yesteryear. Still, you might notice the car feels somewhat sluggish, like the park brake is still partially left on. You might also hear louder than usual road noise, a flap-flap-flap, and odd-feeling steering. If you vehicle is equipped with a TPMS you may well get a warning light on the dash.
TPM-who?
The acronym TMPS stands for Tyre Pressure Monitoring System. Some systems such as the Kia Soul pictured has a very basic TMPS system, once one of the cars tyres deflate to a predetermined point, a warning light is illuminated on the dash.

You have a puncture, what next?

Safety first
Pull over to the side of the road. If you notice the puncture early you may not damage the tyre, and it’s always safer to pull over than just stop where you can be hit. If it’s not safe, let’s say you’re heading over the Westgate bridge in Melbourne, where there are no emergency lanes, then slowly reduce you speed, turn on the hazard lights and drive slowly until you can find a safe place to pull over
Secure the vehicle. Park the vehicle in park/gear and engage the parking brake. If you happen to be driving a 4WD, place the transmission in low range and engage 4WD/lock. This will help prevent the vehicle from moving and possibly falling off the jack.
Chock the wheels. While professional wheel chocks are great, you’re probably not going to be carrying a pair with you. So use your surroundings, even small rocks may make acceptable wheel chocks. If you’re jacking up the left rear wheel, place the chocks, both in front and behind, on the right front, diagonally opposite.

Remove all gear and people from the car. Time to remove the spare, this will, of course, vary depending on where it is kept, but what doesn’t change is where you’ll place the spare tyre. And that’s under the car right next to the flat. If the jack fails while you have a wayward foot under the side of the car, it’ll stop short of giving you a permanent limp!
 Check condition of the spare – Don’t forget to check that the spare has plenty of tread, is the right size and has enough air pressure.
Find the jacking point. Next, you’ll need to ascertain where your vehicle’s jacking points are. If you’re not sure, consult your car’s manual. Don’t have the manual in the car? All’s not lost, check out underneath the car near the flat tyre. You’ll need to look for a substantial piece of thick metal that you’ll be able to securely engage the lifting nose of the jack. There may be a female slot on the standard jack the mates up with a male ridge that protrudes from your vehicle, again check the manual.
 Crack the nuts. Grab the and “crack the wheel nuts”. Most wheel nuts will follow the rule “Righty tighty, lefty loosey”. To crack the nuts turn each fastener anti-clockwise one full revolution. The benefit is twofold, firstly you’ll be using a bit of force to start loosening the nuts, and this could possibly overcome the jack’s stability and push it off. Secondly when initially undoing the nuts, it will tend to rotate the wheel and possibly overcome the park brake etc., instead of the nuts undoing you’ll just spin the wheel.

Jack it up. Place the jack against the jacking point and begin raising the vehicle, if you weren’t able to get the spare under the side of the car, once raised you should be able to slide it under. Only raise the car up enough to slip the flat tyre off and replace with the spare. Unnecessary height will only lead to possible instability on the jack.

![]() Remove the flat tyre. Unscrew the nuts the rest of the way (don’t leave them on the ground as dirt will bind up the threads when you want to screw them back on). Once you have the flat tyre off, swap it with the spare that’s under the car. You can now start installing the spare.
Remove the flat tyre. Unscrew the nuts the rest of the way (don’t leave them on the ground as dirt will bind up the threads when you want to screw them back on). Once you have the flat tyre off, swap it with the spare that’s under the car. You can now start installing the spare.

Bolt on the spare tyre
Clean up. When this foreign matter works its way out after the initial installation, this will end up in loose wheel nuts, next thing you know the wheel studs snaps and the wheel is overtaking you on the freeway!
 Place the Spare on. Line up the studs with the holes in the wheels, I like to put the bottom of the wheel in first, tilted outward toward the top. Carefully tilt the top of the tyre toward the car making sure the studs find the holes cleanly. This can sometime be easier said than done.
Install the nuts. If the thread and nut looks dry of lubricant, a quick squirt of CRC/WD40, or even better a little anti-seize on the stud’s threads will do wonders the next time it comes to change the tyre. Make sure you start each and every nut by hand. If it’s not going on with minimal fuss, find out why. A cross threaded nut (where the nut isn’t started on straight on the stud) will render both the nut and the stud unserviceable so if the nut doesn’t go on easily, stop and ensure you’re threading it on correctly. Maybe try another one first.
 Nip up the nuts. Once you’ve run the wheel nuts down, grab the wheel brace and nip each one up. Don’t lean on the wheel brace as it’ll only probably turn the wheel.
Lower the vehicle. Dependant on the jack used, is usually the reverse process of raising the vehicle. If there is any trick to it, it’s keep any part of your body out from underneath the vehicle and the slower the better.
 Final tighten on the wheel nuts. Grab out your trusty wheel brace and tension the nut at the top, then the opposite one and keep rotating around the wheel until they’re all done. I like to count the numbers out aloud as I tighten them up, it assures me that they’re all done and provides amusement for any onlookers…
Double check the wheel nuts. Head to the top nut again and check the tension of each and every nut a second time, but this time head in a clockwise direction until your back up to the top. You’re now one hundred percent sure every nut is tensioned.
 Want to be sure? If you are somewhat of the pedantic persuasion, the factory manual will have a torque figure, either Nm or ft/lb (Newton meters or Foot Pounds). With a torque wrench you can get exactly the correct amount of torque on the wheel nut as determined by the manufacturer. Keep in mind though you must also use the correct lubricant on the thread as well, otherwise you could be up to 20%-off the intended manufactures torque specifications.
 Pack up. Secure the spare away, along with your tools. Get your tyre professionally repaired as soon as possible. After you’ve gotten the tyre back from repair, when securing the tyre back into the vehicle, don’t forget to orientate it you can easily check the tyre pressure when you’re checking the rest of the tyres. Speaking of tyre pressure, I’ll usually put an extra 10 PSI in the spare above the vehicle’s placarded pressure. This way when you need it, it’ll always be ready to go, even if you neglected to crawl under your rig the last couple of times you checked the tyre pressures. It’s easy to let out a couple of psi to get the correct pressure, it’s not so easy to raise the pressure, without the help of an air compressor.
What’s all this Torque Talk?
At this point you might well ask why we tighten up a wheel nut to a certain torque value in the first place. When you tighten a nut, you do a couple of important thing. Firstly you use the mechanical advantage of the wheel brace and the mechanical advantage of the actual thread form to stretch the wheel stud lengthways. Most people can easily grasp the idea of a longer lever (or in this case, longer wheel brace) giving greater mechanical advantage, but the thread itself? Imagine if you could straighten out the spiral staircase that is a thread. The staircase while now straight, would still go upward. It’s effectively a ramp. Keep in mind that mechanical advantage is simply moving something with a smaller input force (in this case the nut) a further distance (spiralling up the thread form) over a short distance with greater force (in this case the nut’s moving lengthways along the shank of the thread).
You can, however, sometimes have too much of a good thing, in this case you can stretch the stud (remember that’s what you’re doing to provide the clamping force) too much. The stud will eventually reach a length that it doesn’t return to its original length, and the tension can’t be maintained, eventually the stud can stretched enough that it can actually snap!
This leads to an important point. Never let the tyre shop use a rattle gun (pneumatic impact wrench) to tighten your wheel nuts! These pneumatic monsters usually provide way too much twisting force on your wheel nuts; at worst they’ll be a real pain to get off and they may even stretch the studs permanently.
By way of example, a group of friends and I were heading up into the Victorian High Country, and came across a particularly distressed fella and his Range Rover Sport at a Mansfield service station. He had a flat and couldn’t undo the wheel nuts. It wasn’t for a lack of physical prowess either, as he had broken the stock folding Range Rover wheel brace trying! Luckily I had a quality socket set and a breaker bar with me. I ended up using my Hi-Lift jack handle to give me extra leverage to eventually undo the remaining nuts. The tyre fitters no doubt were going to be dealing with an unhappy phone call come Monday. As much as they might whine and complain, insist the tyre guys use a wheel brace to do the wheel nuts up.
No spare despair
Some vehicles these days, in the never-ending quest for weight reduction and fuel economy don’t even come with a spare tyre from the factory. What are your options on the side of the road in a car without a spare?
Usually a car that comes sans spare tyre from the factory will be equipped with either run-flat tyres or an inflation kit. The inflation kit will consist of a small air compressor that can be powered from the vehicle and a can of tyre sealant. The theory is that after recognising the car has a flat tyre, you then remove the offending screw/nail from the tyre tread, fill the tyre with the tyre sealant and top up the air using the air compressor.
Unfortunately, not every time you get a flat will the handy-dandy inflation kit be able to see you driving off into the sunset. Tyre side wall gashes, tyre damage from large potholes and a myriad of other tyre damage situations will end up in a phone call to your chosen automotive roadside assistance service wishing you had actually ticked the “full-size spare wheel” option at the dealership instead of the premium paint. Another consideration is the tyre sealant can render a TPMS (tyre pressure monitoring system) sensor inoperative. The replacement sensor can run into the hundreds of dollars.
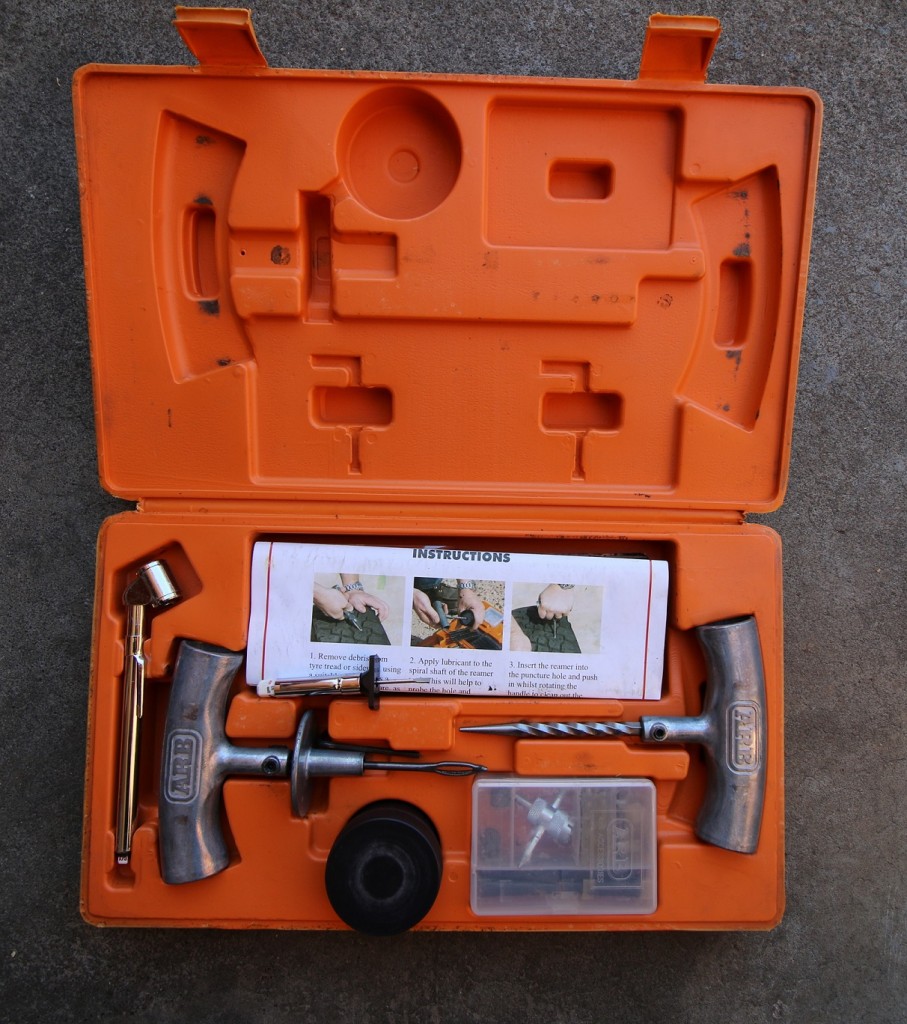
Plug it Up
Another alternative usually associated with 4WDers is a plug-repair kit. Allowing a temporary, external repair of the tyre without even removing it from the vehicle.
To use the kit, firstly you’ll need to determine where the wheel is leaking from. You’ll hopefully be able to remove the offending item from the tyre and begin the repair. Grab the spike from the kit, apply some of the lubricant from the kit to the shaft of the spike. You’ll notice that the shaft of the spike is equipped with a helical flute, somewhat like a drill bit. This is designed to clear any debris that may be left in the tread of the tyre that would stop the plug from getting an air tight seal.
Run the spike through the puncture in the tyre using a clockwise twisting motion. This’ll allow the flutes on the spike to clear the debris. You’ll feel the spike working its way through the tyres internal steel reinforcing as you push it through the tyre. Continue twisting in a clockwise direction as you withdraw the spike.
At this point you’ll need to take one of the plugs and thread it into the split of the needle tool. Place it so the plug is in the middle of the eye of the needle. Push the needle into the prepared hole in the tyre until it bottoms out. With your other hand, hold the needle’s collar firmly against the tyre and withdraw the needle from the tyre. This will leave the half of the plug embedding in the tyre tread. You can trim the excess plug to almost flush with the tyre’s surface to finish up. If one plug isn’t enough to stop the air from escaping, you can add multiple plugs to the same hole without issue.
This however, is only a temporary repair and the tyre should be professionally repaired at the first opportunity. To give you an idea of the durability of a plug repair, I know of a truck tyre that was repaired using a temporary plug, keeping in mind, truck tyres usually have inflation pressures in excess of 100 PSI and deal with much greater loads than any passenger car tyre. This “temporary repair” then went back into daily use and was still retaining air when the truck was sold in excess of two years later. Of course we don’t condone this usage, but it does go some way to explaining the potential durability of a plug repair.
Once the repair is complete, you’ll be able to use the air compressor and a tyre pressure gauge to inflate the tyre to the proper pressure and be on your way.
Next time you head down to your favourite auto supermarket, grab a packet of metal valve caps. If the Schrader valve comes loose, the air will leak straight past the seal of most plastic caps, the metal caps however have a gasket that’ll retain the air in the tyre even if your Schrader valve is a little loose, preventing you from the whole deflating experience….
An Ounce of Prevention…
…Is worth a pound of cure, in this case make sure that the tyre pressures are checked at least once every two weeks and keep an eye on tread wear. Tyre rotation at regular intervals will even out the tread wear amongst all of the vehicle’s tyres. Tyres with less wear will be more puncture resistant. While tyres are roadworthy down to one and a half millimetres of tread depth, their puncture resistance and water shedding ability at this little treat depth is greatly compromised. Four wheel drive tyres that actually see off road should be replaced when they are below two third of the original tread depth. Old, hard tyres call also be more easily compromised. If you want to learn how to check the age of your tyre check out our very own Robert Pepper’s tyre age article.
In conclusion…
A great tip for new comers is to practice in the driveway at home. It’s almost guaranteed that if you don’t, the first time you get a flat, will be at night, in the rain, two hours from home. Murphy is not your friend, but proper preparation can be.


I have performed countless ‘temporary’ tyre repairs on my family vehicles and have never had any let us down (pun intended) yet. An extremely cost effective and satisfying result. Pulling out the nail or screw that caused all the hassle and plotting your revenge is also reasonably satisfying…or is that just me?
Revenge?
The article was actually about changing wheels. When I first saw the article I thought, good, perhaps there is something new about getting tyres off the rims. Not so. However as usual an informative article by Robert.
Suggestion; an article on using modern auto gear boxes to assist braking when towing caravans
Thanks but I didn’t write this one!
I didn’t know that you can find jacking points in the car’s manual. Since I no longer have the manual, I think I should just get my car towed to a tyre shop. That way, I could get the other tyres changed out as well.
Helpful tips that everyone can follow through. With the right tools and instructions everything will be good.
Your tips and ideas are great and helpful. Thanks a lot for saving my money.
Thank you. loved your article. It was really helpful for my business.
Wish to see more in the coming days.